Unity 101: Developing a 3D Disney Platform Game

Dernière mise à jour : 10 oct. 2022
Studying the field of augmented and virtual reality, I was expecting to be able to experiment with software that allows the creation of 3D spaces, the manipulation of objects and interactions. It was therefore not surprising to discover Unity, a tool for developing video games, and more generally 3D environments.
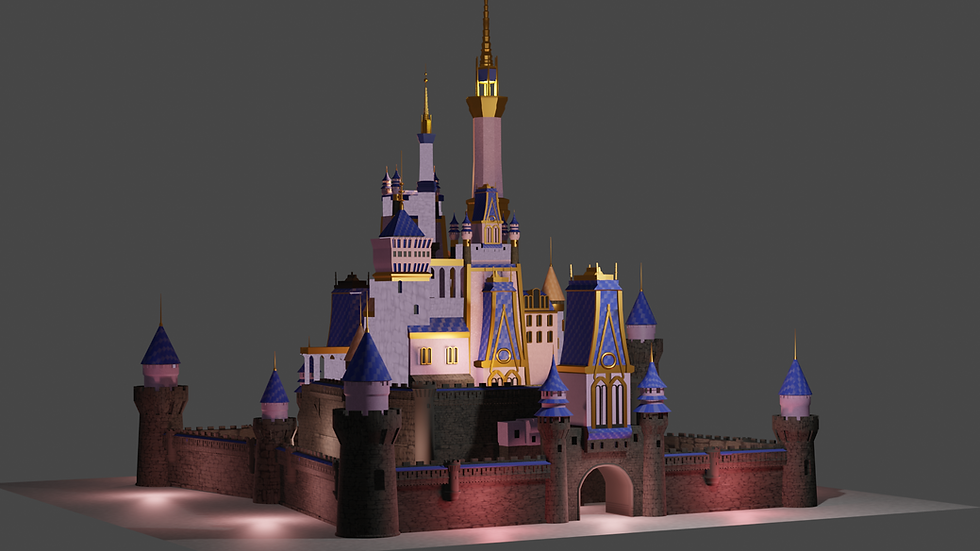
In this article, I will not detail my learning of this software during my three days of formation, but I will describe all the steps of my final project which consisted in making a small 3D platform video game. What I learned during my classes will entirely be used to put to good use my desire to make a small game on the theme of Disneyland. In addition, this article follows the one on Blender, in which I made different models, like the castle that will be the heart of our environment, but also the humanoid that we will control in this game.
Summary
Creating the general environment by using Blender models
To start our project, we had an empty 3D space in which we had to start from scratch. I decided from that moment on to reorganize my assets in different folders so that I could easily organize afterwards. So I have these files: "Animations", "Images" (to put panels in the game), "Scripts" (to code the different interactions), "Models" (for Blender models), "Music" or even "Textures. It will be easier after to find the different elements for our project.
So now, we have to use the castle that we created before. In order to import it, I had first to export the model into a FBX file. My castle had some problems during this part, because some parts of it were destroyed by the exportation, and the textures were not exported properly. I spent a loooot of time trying to fix that. I had to recreate the textures by hand, and assign them to some parts of the castle. Finally, I managed to have the center of my game environment. I created a starting platform too.

The first (huge) brick of our wall
The logical following was to create the general the global layout of our game. In my case, I didn't want to have a really complex game, so the platforms were only cubes, with different shapes and heigts. To have a greater gameplay time, I decided to split the way into two, with a dead end (with only collectibles), in order to force the player to go back and have more steps before the finish, in a small space at the end.
Now that the platforms are placed, I decided to add some textures to them. I simply downloaded some images that are linked with Disney's world, and put it on the platforms. I also added other Blender models (like Mickey, Pluto or Stitch) or trees in order to have a nicer environment. We have now a peaceful and magical place.
Some images of the environment where we will play
Animating, controlling and filming our player
Now that we created a simple environment for our game, we had to be able to play it. So in this part, we had to create a character, animate it, and be able to control it. For the player, no problem because we created one in our Blender project. I am able to move this humanoid, because I used a skeleton (for more informations, take a look at Blender article). However, it is really long and difficult to animate by hand all the behaviours of our player. In this project, I wanted to have 4 animations (Idle, Running, Walking and Jumping), so in order to have these easily with my model, I tried Mixamo. In this online software, I uploaded my humanoid, and exported all the animations I needed.

My Blender model is now able to jump
Now that we have a character that will discover our Disney Platform Game, we must be able to put it in our game, and control it. For that, I put my idle animated player in my scene, in the starting platform. I added a rigidbody, and two scripts in it. The first one was responsible of controling our player, and the second one linked our mouse with a camera that followed our it. At the end, we are able to play with our little character.

But if we want to have all the animations depending on what we are doing, we must create an animator, create some links between each state and conditions to change. I will not detail all the thinks I did, but thanks to the panel below, I easily managed to make my player jump with a great animation, or walk when I pressed the z button.

Animator that I used for my player
Adding music, UI and collectibles
Okay so here we managed to have a simple playable game, with cool working animations, colorful platforms and magical Blender models. However, we had other things to do in the specifications.
First, I wanted my game to be more immersive, so I put a background music. Yes, I chose "It's a small world", the famous Disneyland's music that can be stuck in player's head for many days long. It was easy to do: just put a music on the Third Person Camera (which is following the player).
Then, I decided to add some informations on the screen during the game (this is called UI). First, I wanted to add a timer. I created an UI directly on my Unity Project, and put a text that can be changed by a timer script. Our game should last one minute minimum, so now we were able to verify it.
The second element to add here was collectibles. I decided to add some coins to find (because you need it in Disneyland). I created cylinders with a gold texture, and added one script to make them spin, and another one to make them collectibles. When the player touches a coin, a trigger is activated and a script works. This script destroys the coin, and change the text of the UI, so we can have a coin counter. I will not describe the scripts, but at the end, we can have a game with interesting stakes.

Coins, collectibles counter and a great timer
Finishing the project with traps and "puzzles"
Now, in order to finish our project, we must add spicy touches, like traps that can make it a bit harder. Here, I used a basic principle for each trap I did: the door. For these, I created 3D doors, that I first animated by hand. I created two animations (open and close), and defined an idle position in our animator. I created also a trigger for each situation (a pressure plate pour the classic door, or a coin for the traps). Finally, I wrote a script that simply can activate the animation while triggering the elements. At the end, I made three traps in my game: one simple door for my space mountain part, one trap door in the princesses red carpet and another one in the Lilo and Stich's beach. Taking a coin activates the trap. And that's it !
Opening the door with a pressure plate

Another trap...
Finally, we managed to build from scratch a really cool mini game, with interesting mechanics, a unique theme in a well done 3D environment. I am really proud of this project because I used two softwares that I learned during 3 days to create an awesome project. These knowledges will be really useful when we will have to develop AR and VR environments. To conclude, here is a video that shows you a little bit more my game.
Commentaires