Blender & 3D Modeling

Dernière mise à jour : 10 oct. 2022
In this article, I decided to focus on one of the first software we studied in this master: Blender. This latter is really known because of its infinite possibilities in the 3D modeling field.
For me, that was the first time I had a course on it, and I didn't have the possibility to practice it before. However, I'm a real regular of the adobe range on which I've already made a lot of videos and animations. For my personal enrichment, learning it would be better.
In this article, I will show my different creations during the laboratories in class, but also at home during the last project. The progress is really motivating in this module, because I started with a rocket, and finished with the Disneyland's Castle (that took me 20h). This text will be split with for each part a project that I realized.
Summary
1) Modeling and Texturing a Simple Rocket
After learning the different basic commands that allowed us to modify simple shapes (like rotation, scale or movement), as well as the different ways of modifying the points of an object (with extrudes, splits,...), we were able to start designing our rocket. We have imported a simple image, on which our model can be based. For the main shapes of the rocket, we extended a circle to make the main body, then placed a cone on top, then made the feet by applying extrusions to squares, before making successive rotations. A cylinder was added to make the window.
After smoothing, we were able to work on materials in order to add textures to the rocket. We just had to create materials, to select parts of the rocket and assign the texture. Here, we just chose colors and tried the glossy effect.
Rocket structure without texture And now with the textures applied
This first model was not really hard to create, however we managed to have a great result in a very short period of time. I was proud of being able to create a first example that was convincing.
The last thing we tried in this model was to animate it. By opening the timeline, assigning position or rotation parameters to a keyframe and moving it through time, we were able to have a really simple representation of a take-off. It was really motivating to do that only the first day of practicing.

Creating a simple animation of the rocket using Blender
2) Working on lights by creating a Hammer
The next day we tried to work on a more realistic and difficult model: a hammer. The added value of this project was on the one hand to model this object without a reference image, but also to practice using modifiers. So we first made the handle with a cylinder, then the top of the hammer with extrusions and rescales. We were able to create the hole in the metal part of the hammer using a modifier.
Then we learned to use textures from images. We downloaded wood and metal textures, which we could apply to specific areas of our model. Using the shader settings, it was easier to make these parts look more real. I'm quite proud of the rendering here, the general shape related to the different texture elements make our projects quite convincing and realistic.
Sometimes some textures didn't fit on the object as we wanted. In this case, we used the UV editor, which has a smart mapping feature that can put the texture back on the object in a consistent way. We needed this on a few parts of the hammer.
Hammer formed in the first part And after adding the different textures
The last thing we did here was to add some lights, in order to have a more realistic scene. It was not really difficult: a light is an object (like meshes used before), that we can place and rotate as we want. At the end, it gives us this view:

3) Creating our own animated character
Here was the last project we had to do in class during a lab. We had to create a really complex object: a humanoid. We used here different images of the front, the side and the back in order not to be lost.
We first started with the body, by extruding rectangles and rescaling them. We did that by locking our point of view in the front. The rendering was not really accurate because we only had the details of the front view. It wasn't very difficult at the moment because we only had to manage one side. Doing the arms was a bit more complicated. On the other hand, we used a modifier that allowed us to only deal with the left side, and that recreated the right side in mirror image. The same goes for the side, we could follow the shape of the background image to get a pretty convincing result.
However, modelling only the face and side does not allow us to have a realistic humanoid. Indeed, we had more of a cube shape, but the roundness of the body was really not great. So we had to go back to the model, add points and change their positions individually to get more consistent shapes. This was the most difficult part. I tried to model hair, nose, eyes and ears, which is really hard to do (using extrudes again). Unfortunately I didn't take any pictures of the evolution, but in the end I got a character like this one.

My (awesome) 3D character
We finally learned some basics about characters animations. We had two solutions for this. We could do it via the software, using a skeleton. We put the skeleton into the character, and when we merge the two, we can then move the skeleton joints and animate our humanoid. The other solution is to export the character and use the Mixamo website, which automatically proposes character animations and applies them to our models. This is the software we will use later for our Unity project.

Playing with the skeleton
4) Final project: Disneyland's Castle
In almost a week, I progressed a lot on using this software. I learned a lot, and I went from a single rocket to this final project. For the latter, I wanted to push the difficulty level to the maximum of my abilities (because I love challenges). Being a big fan of amusement parks in general (being an engineer in this field could be fun for me), I had to reproduce this monument: the Disneyland castle. This last one would allow me to work on almost all the notions seen in class (the work of complex forms, the work of materials and textures but also the work of lights). Moreover, I was planning to make a similar theme for my Unity project, so creating this model would allow me to easily have a nice background for this other project.
To begin with, I worked on each element using a background image. I tried to work the elements myself, reproducing the details using very small deformed and connected cubes. Many elements are reused later in other parts of the castle (for example some towers, some walls or the front door). Concerning the depth, I took a lot of freedom on the position of the elements (because I don't have the side view). The basic image was only a starting point.
When everything was in place, when all the shapes of the castle were arranged, it was time to create the textures. No need to describe in detail, but I downloaded all the textures from the internet, selected areas of the castle and simply applied the texture. I had to do some UV editing to get the texture to match. It took about 6 hours for this castle. Finally, I added lights all over the place, to get a perfect 3D model. I'm extremely proud of my work, which took me a long time but is worth it. I can finally create 3D models that I thought were impossible to make in such a short time. I still have a lot of room for improvement, but this project is obviously a huge source of pride.
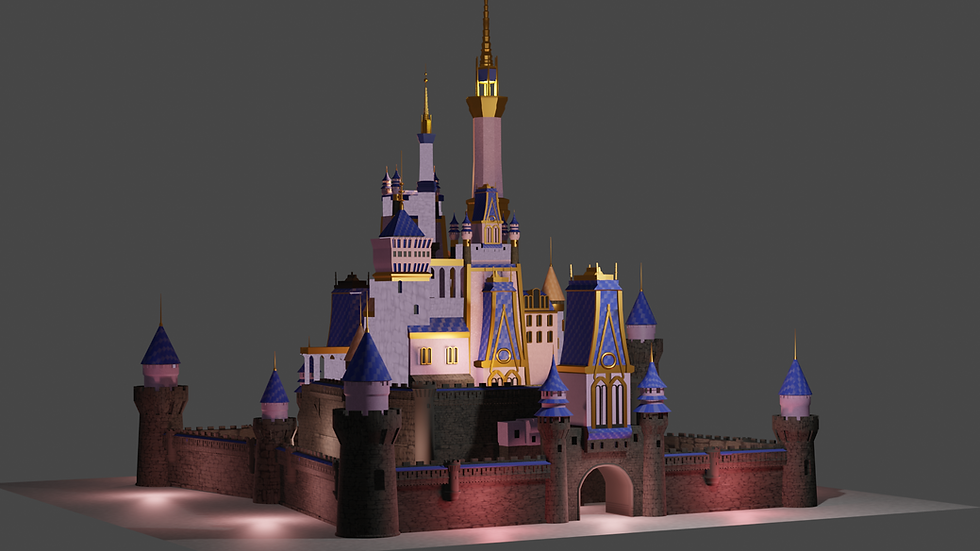
And here is the final result. Really proud of this one !
Now, we can use these different knowledges for another project, the Unity one. We are going to create a platform game in this castle, with Disney's characters.

Commentaires